

These colorful little ladybug painted rocks are the sweetest addition to your garden bed, but they can also be nestled inside house plants or used as paperweights! All you’ll need are some smooth rocks, outdoor paint, and sealer.

Why we love this project
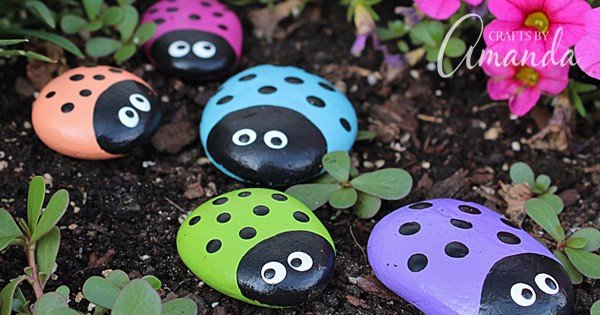
Aren’t these ladybug painted rocks the sweetest? Each of the ladybugs has their own personality painted in vibrant colors and separated by their mismatched sizes and shapes. I can’t begin to tell you just how many people have passed by my garden bed in front of my studio and complimented them! I unfortunately even lost a few to passersby who pocketed them. At least they’ll continue to bring joy to others.
I first made these cuties back in 2007-2008, however, I didn’t get them up on my blog until 2016. They’ve gone viral for quite some time now, for obvious reasons! They’re downright adorable, and honestly super easy to make. All you’ll need are some smooth rocks, colorful outdoor paint, and a good sealer to keep them from succumbing to the elements. Ladybug rocks are great for your indoor pots, outdoor garden beds, hanging plants, or even as paperweights. They’re a fun summer craft for kids, adults, and seniors alike!
Related – You may also love this Halloween version of garden rocks, Glow in the Dark Monster Rocks! I’ve even put together a collection of ideas for painted rocks for you! Don’t miss our cactus rocks too!

What You’ll Need to Make Ladybug Painted Rocks
I’ll show you how to make them in the video within this post. You can find the printable instructions at the end of this post.

Expert Tips and FAQ’s
You can find river rocks at any home improvement store (like Lowes, Home Depot, etc), at garden centers and craft supply stores like Michaels. Be sure to check the floral department in craft stores if you are having trouble locating them. And of course, you can buy them here on Amazon.
I personally do not sell my ladybug rocks, however, there are several sellers on Etsy that are selling ladybugs similar to mine. You can find those here.
You will see the paint I used below and in the supply list. It’s called Patio Paint and is formulated specifically for outdoor use. I love it and have been using it for years. You can get it on Amazon here, or check your local craft supply store.

I hope you have fun making my ladybug painted rocks! You can choose any colors you prefer to make them, just be sure to seal them to protect them from the elements.
If you are looking for another way to use your ladybugs, check out my ladybug tic tac toe!
More Garden Crafts
Ladybug Painted Rocks
Learn to make these adorable ladybug painted rocks. use special outdoor paint for this adorable garden craft so you can keep garden ladybugs all summer!
Supplies
- Patio Paint in colors of your choice I used Larkspur Blue, Petunia Purple, Fiesta Yellow, Fuchsia, Citrus Green and Salmon
- Smooth rocks preferably oval or round in shape
- Paintbrush
- Toothpick
- Outdoor sealer or Patio Paint Clear Coat
Instructions
-
Wash and dry your rocks.
-
Paint with colorful Patio Paint, don’t paint the bottoms if these will be sitting in the soil.
-
Paint on a black head and let dry.
-
Use the handle end of a paintbrush to dot on ladybug spots with black paint.
-
Use the handle end of a paintbrush to dot on white eyes. LET DRY COMPLETELY!
-
Cut the tip off of a toothpick. Dip in black paint and dot onto white eyes.
-
When completely dry, paint ladybugs with a coat of Patio Paint Clear Coat or outdoor formula sealer like Mod Podge.
This project was originally published on this blog on June 11th, 2016. These ladybug rocks were originally featured on Parenting magazine’s website back in 2007 – 2008.
Trending Products


