
School-aged kids will use a wax resist technique to create an ice cream cone painting in this fun project. We’ve included a free printable to make this lesson easy for home or classroom use.

Wax Resist
When used properly, the wax from crayons will resist watercolor paint that is layered on top of it. This technique allows artists to more freely paint without as much concern to the details. In this project we will layer watercolor and crayon to create highlights in our ice cream cone.
Related: Explore other fun Watercolor Techniques using basic household supplies.
Supplies Needed to Make This Retro Ice Cream Cone Art Project

- Ice Cream Cone Printable – Free Download Below
- Watercolor Paper
- Carbon Paper
- Pencil
- White Crayon
- Permanent Marker
- Watercolor Paints
- Paintbrush
- Water
- Paper Towels
- Washi Tape
- Cardboard
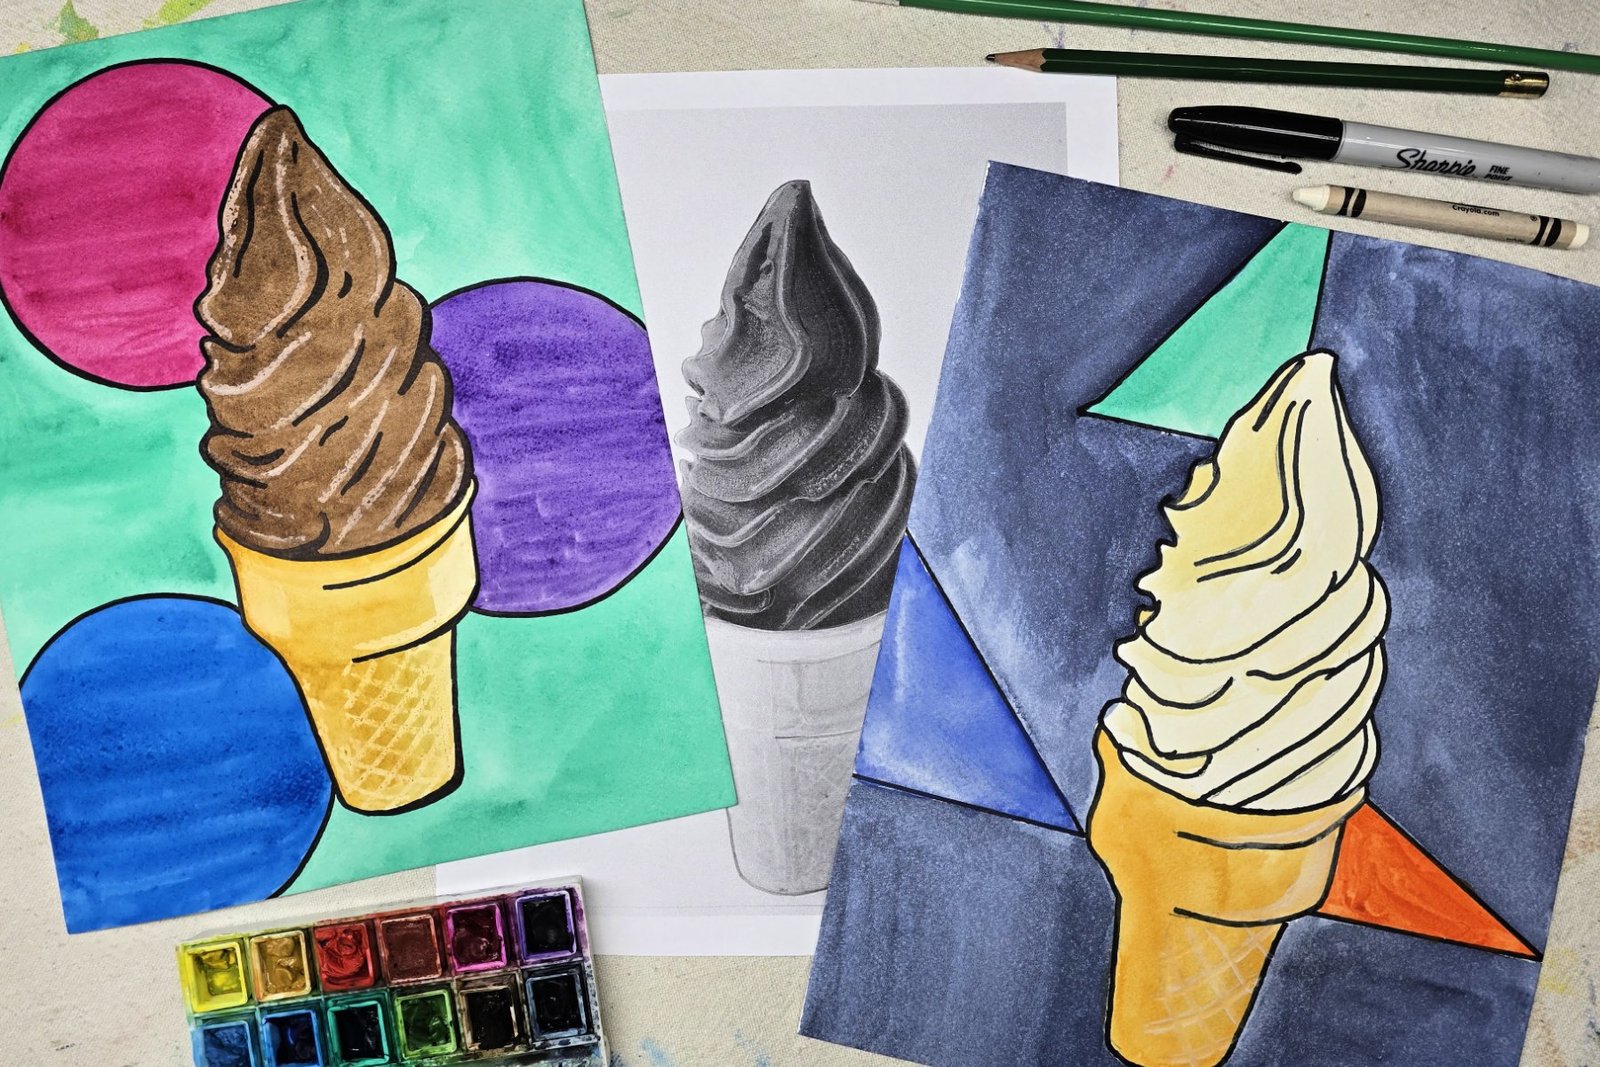
Download the Ice Cream Cone Printable Here
Use this free printable ice cream cone to easily give kids a reference image for their design. We’ll be using carbon paper to trace the design directly onto the watercolor paper in this project. Printing the image in black and white may assist students in seeing where the highlights and shadows are on the image.
Directions to Make Retro Ice Cream Art
Step 1

First, place carbon paper between printed image and watercolor paper. Carefully attach layers to a firm surface with tape to prevent them from moving during the transfer process.
Step 2

Next, use a pencil, ballpoint pen, or other blunt object to firmly trace the ice cream cone image to transfer it onto the watercolor paper.
Tip: If you do not have carbon paper, simply fully color the back of the ice cream image with a crayon, pencil or charcoal before tracing. This will give the same transfer effect.
Step 3

Then, draw shapes throughout the background of your drawing. Kids may choose to trace objects to create smooth, uniform shapes.
Step 4

Next, add the first layer of watercolor paints to your design. This first layer of watercolor applied to the cone and ice cream should be of a lighter value.
Set aside to dry. Tip: Carefully speed up the drying process with a hairdryer or heat gun.
Step 5

When the paint is dry, use a white crayon to mark highlights on the ice cream and cone painting. The white crayon should be applied firmly wherever highlights are to remain in the finished project.
Step 6

Then, use a darker value of color to paint over the ice cream and cone. Kids can paint directly over crayon as it will resist the watercolor paint and leave the lighter value colors exposed for highlights.
Allow paint to dry.
Step 7

Finally, add bold outlines and shadows to your painting with a permanent marker.
Finished Retro Ice Cream Cone Art Project

I love these bold paintings of ice cream! Since these projects are made on paper, they can easily be framed, clipped, or displayed in your preferred style.
Our Experience Making this Retro Ice Cream Cone Art Project
This is a fun project that allows kids to practice art techniques such as wax resist, shadows and highlights, using carbon paper, and so on. I like the bright colors that kids use for this project and their creativity in turning the ice cream cones into their favorite flavors. I also appreciate the bold lines as they help deter kids from seeking a more realistic and perfectionist approach.
Prep Time
5 minutes
Active Time
30 minutes
Total Time
35 minutes
Difficulty
Medium
Estimated Cost
$1
Materials
- Ice Cream Cone Printable
- Watercolor Paper
- Carbon Paper
Tools
- Pencil
- White Crayon
- Permanent Marker
- Watercolor Paints
- Paintbrush
- Water
- Paper Towels
- Washi Tape
- Cardboard
Instructions
- Place carbon paper between printed image and watercolor paper. Carefully attach layers to a firm surface with tape to prevent them from moving during the transfer process.
- Use a pencil, ballpoint pen, or other blunt object to firmly trace the ice cream cone image to transfer it onto the watercolor paper.
Tip: If you do not have carbon paper, simply fully color the back of the ice cream image with a crayon, pencil or charcoal before tracing. This will give the same transfer effect.
- Draw shapes throughout the background of your drawing. Kids may choose to trace objects to create smooth, uniform shapes.
- Add the first layer of watercolor paints to your design. This first layer of watercolor applied to the cone and ice cream should be of a lighter value.
Set aside to dry. Tip: Carefully speed up the drying process with a hairdryer or heat gun.
- When the paint is dry, use a white crayon to mark highlights on the ice cream and cone painting. The white crayon should be applied firmly wherever highlights are to remain in the finished project.
- Use a darker value of color to paint over the ice cream and cone. Kids can paint directly over crayon as it will resist the watercolor paint and leave the lighter value colors exposed for highlights.
Allow paint to dry.
- Add bold outlines and shadows to your painting with a permanent marker.
Notes
Retro Ice Cream Cone Art Variations
- Skip the printable and have kids draw their own ice cream designs.
- Explore various mediums to add texture and variety.
- Adapt this project to fit any holiday or seasonal theme.
Retro Ice Cream Cone Art Variations
- Skip the printable and have kids draw their own ice cream designs.
- Explore various mediums to add texture and variety.
- Adapt this project to fit any holiday or seasonal theme.
Other Fun Watercolor Art Projects from Kids Activities Blog
Did your kids enjoy creating this retro ice cream cone project? What flavor ice cream did they portray?
Trending Products


